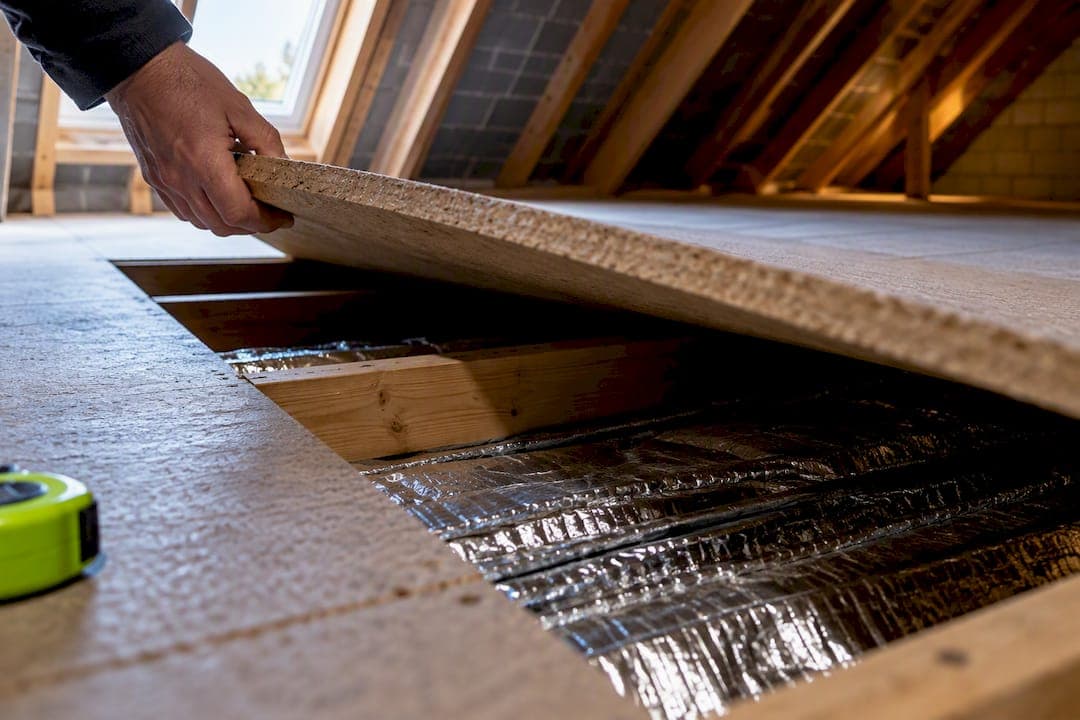
Yes, you can board over multifoil, but only if you keep the air gaps intact, maintain continuous eaves ventilation, and confirm your joists can carry the extra load. Before you lift a single board, check insulation depth, joist condition, wiring around downlights, and whether any vents are already blocked. If any of that is uncertain, get a professional survey or ask Revive Maintenance for a compliance check before you commit.
TL;DR:
- Boarding directly onto multifoil without maintaining air gaps reduces insulation performance and risks damp-related issues; supports like loft legs or noggins are essential.
- Structural integrity, joist span, previous modifications, and insulation depth must be assessed before fitting, especially for larger or habitable conversions requiring building control approval.
- The support height should match insulation depth to avoid compressing insulation and disrupting airflow, with ventilation measures like eaves vents and rafter trays also necessary.
- Most DIY loft boarding is suitable for simple storage, but complex situations or previous spray foam installations benefit from professional surveys and detailed reports.
- Incorrect installation, such as pressing boards directly on insulation or blocking vents, is a common mistake that compromises thermal performance and ventilation; thorough checks before implementation are crucial.
Table of Contents
- Tools and materials for raised loft boarding over multifoil
- Do you need building control for loft boarding?
- Why multifoil needs air gaps to work properly
- Loft legs, noggins or raised floor systems: which one fits your loft?
- How to board a loft over multifoil step by step
- Common loft boarding mistakes and a pre-use checklist
- When a professional survey beats a DIY attempt
- What this guide gets right that most DIY advice misses
- Get a survey or installation booked with Revive Maintenance
- Sources
- FAQ
Tools and materials for raised loft boarding over multifoil
Boarding straight onto multifoil crushes the reflective air gaps that make it work, so the right kit is one that lifts the floor clear of the insulation rather than pressing down on it.
- Raised supports: loft legs (commonly available in 175mm and 270mm heights) or timber noggins cut to size, which give you more control over exact height where joist depths vary.
- Boarding: 22mm tongue-and-groove chipboard or purpose-made loft panels rated for domestic storage loads; cheaper 18mm board flexes too much over wide spans.
- Ventilation gear: rafter trays (also called eaves baffles) to keep airflow moving from eaves to ridge, plus proprietary eaves vents if yours look blocked.
- Safety extras: fire-rated downlight covers, foil tape compatible with your multifoil brand, and galvanised fixings sized for the boarding thickness.
- Tools and PPE: a cordless drill, spirit level, loft crawl boards, dust mask, knee pads, and a head torch, since most loft work happens on your knees in poor light.
Raised systems like these are standard UK practice precisely because they stop insulation being squashed flat by the boarding above it. Buy for the job in front of you rather than whatever is cheapest on the shelf. A loft with 100mm of headroom above the joists needs a different support height to one with 250mm, and guessing wastes both money and thermal performance.
Do you need building control for loft boarding?
Most homeowners boarding a loft for storage never need to involve building control at all. If you're only adding a raised floor for boxes and Christmas decorations, and access stays via a loft ladder rather than a fixed staircase, the work generally falls outside the scope of building regulations.
That changes the moment you start altering the structure. Fitting a permanent staircase, strengthening or replacing joists, or converting the space into anything habitable all bring building regulations approval into play, and skipping that step can cause real problems at resale or remortgage.
Statistic callout: Local authority guidance is blunt about the risk of getting this wrong: boarding over insulation "will compress it and seriously reduce its energy saving properties," and councils advise seeking qualified advice wherever the joists' load capacity is in doubt, according to Lancaster City Council's building control guidance.
Before you decide which category you fall into, run through a few practical checks:
- Look at the joist span and depth. Long spans (over 3.5 metres) with shallow 100mm x 47mm joists were never designed for storage loads, let alone a person walking across them.
- Check for existing sag, cracking around ceiling joints below, or bounce underfoot. Any of these point to a structural conversation, not a DIY weekend.
- Note whether the loft has already been altered (extra bracing, strengthened joists, previous conversion work), since that changes what a surveyor needs to assess.
If your ambitions stretch to a proper conversion or fixed stairs, building control will want photographs, measurements, and your load assumptions documented before sign-off. Our guide to Part L insulation depths and building regs covers the paperwork trail in more detail if that's the route you're on.
Why multifoil needs air gaps to work properly
Multifoil doesn't insulate the way mineral wool does. It relies on reflecting radiant heat back into the room, and that only works if there's a genuine air gap either side of the foil layers, typically 25mm or more, with the reflective surface facing clean air rather than a board pressed against it.
Squash that gap and you lose most of the benefit. Independent testing has repeatedly found that multifoil underperforms deep mineral wool when it's fitted without the correct air gaps and detailing, which is exactly what happens if boarding sits directly on top of it. Treat multifoil as a system that depends on precise installation, not a product you can bury and forget.
Before boarding, work through this list:
- Fit rafter trays at the eaves if you haven't already, so air keeps moving from soffit to ridge and doesn't pool as damp, cold pockets.
- Measure your existing insulation depth. If you're short of the 270mm total mineral wool equivalent that Part L targets, consider topping up with bulk insulation between joists rather than relying on multifoil alone.
- Check the multifoil for any damp staining or sagging, both signs the vapour control layer has already failed somewhere.
- Seal every service penetration (cables, pipes) with foil tape compatible with your product rather than leaving gaps for warm, moist air to escape into the roof void.
Pro Tip: If your multifoil doubles as a vapour control layer, avoid puncturing it more than necessary when fitting supports. Where you do need a fixing through it, seal around the hole with matching foil tape rather than trusting the fixing alone to keep it airtight, a detail covered in our SuperFOIL installation guide.
Loft legs, noggins or raised floor systems: which one fits your loft?
All three options do the same essential job, lifting your boarding clear of the insulation but suit different lofts and different budgets.
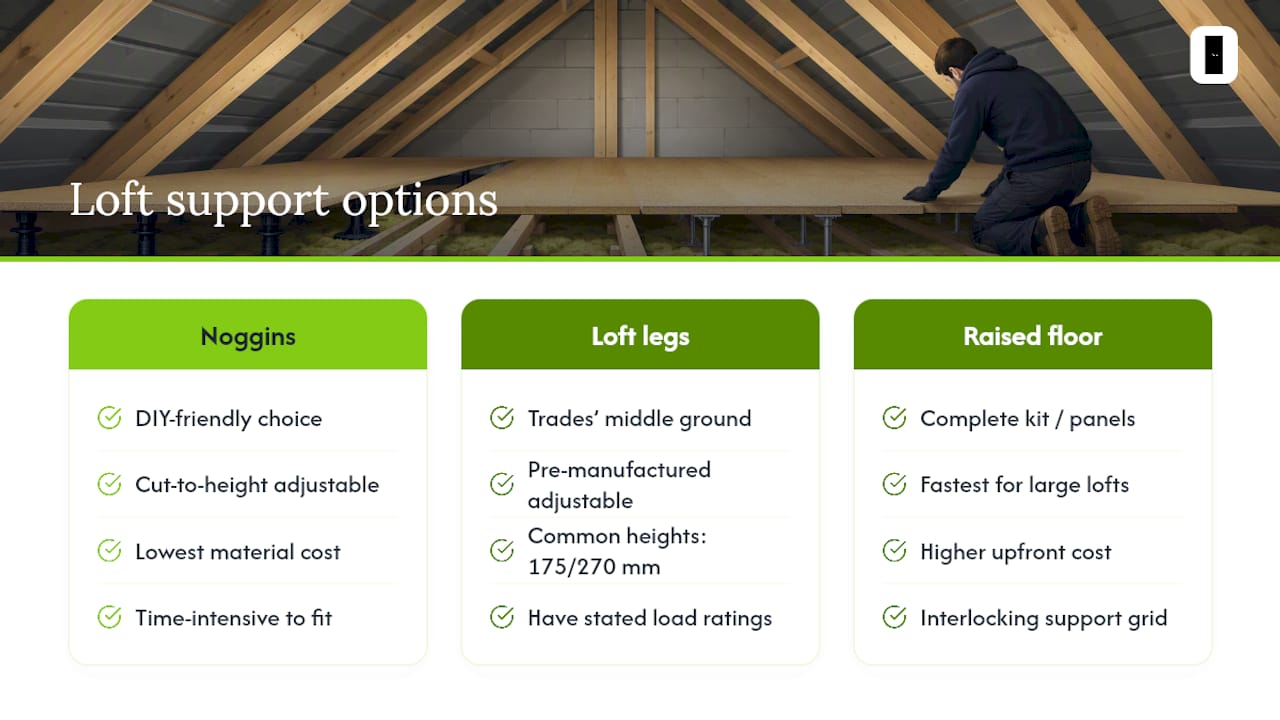
Timber noggins are the flexible, DIY-friendly choice. You cut lengths of timber to whatever height clears your insulation depth and fix them across the joists at right angles, creating a new level surface. They cost little beyond timber and screws, and you can adjust height precisely where floor depth varies across the loft, useful in older houses with uneven joist runs. The trade-off is time: cutting, levelling, and fixing dozens of noggins by hand takes a full weekend on an average semi-detached loft.
Loft legs are the middle ground most trades people reach for first. These are pre-manufactured adjustable feet, commonly sold in 175mm and 270mm heights, that screw down onto the joist and support the board above at a fixed clearance. They're quicker to fit than cutting noggins, come with stated load ratings so you're not guessing at capacity, and their uniform height keeps the finished floor level without much fuss. UK suppliers publish specific spacing and load guidance for their own products, and it's worth following that rather than eyeballing spacing yourself.
Raised floor systems are the fastest option for larger lofts or where you want a genuinely uniform finish, such as ahead of a sale or an EPC assessment. These arrive as a more complete kit, sometimes interlocking panels on a support grid, and cut installation time significantly on bigger jobs. They cost more upfront than loft legs or noggins, but for a loft you're boarding in one go rather than piecemeal, the labour-saving often closes that gap.
Whichever you choose, the underlying principle stays the same: the support height must clear your insulation depth without compressing it, and the gap between the top of the insulation and the underside of the board must stay open to air, not sealed shut. A support system that looks sturdy but crushes the multifoil beneath it has solved the wrong problem.
How to board a loft over multifoil step by step
Work through these stages in order rather than jumping ahead to boarding, since skipping the prep stages is where most damp and thermal problems start.
- Prepare the loft. Clear everything out, then inspect every joist for sagging, splitting, or damp staining. Identify cables, pipework, and any downlights poking through the ceiling below. Measure your existing insulation depth at several points, not just one, since depth often varies loft to loft.
- Fit ventilation measures. Install rafter trays at the eaves if they're missing, and confirm airflow runs clear from soffit vents through to the ridge. Blocked eaves ventilation is one of the fastest routes to a damp roof void, whatever insulation you're using above it.
- Install your chosen supports. Fix loft legs, noggins, or a raised floor kit to the height that clears your insulation without compressing it. Use a spirit level across several joists as you go, and space supports according to your product's guidance so the load spreads evenly rather than concentrating on one or two joists.
- Lay the boards. Stagger joints so no two board ends meet on the same joist, fix through into the supports rather than the insulation, and leave a small expansion gap at the edges. Keep boarding clear of the eaves ventilation path, don't be tempted to extend boards right to the wall plate where airflow needs to travel.
- Run final checks. Press down gently across the new floor to confirm there's no give or crushing underneath. Check any downlights have fire-rated covers and haven't been buried under insulation. Take photographs of the finished job, useful for building control records if you've done structural work, and useful for a future buyer's surveyor either way. Note the board's stated load limit so you don't overload it with storage later.
Pro Tip: When headroom is tight and you can't fit full-height loft legs everywhere, cut boards into narrower strips and stagger the fixings across several joists. Spreading the point load this way avoids concentrating weight on one joist, which is where deflection and creaking usually start.
Common loft boarding mistakes and a pre-use checklist
The single most common fault is boarding flat onto insulation with no gap at all, which crushes multifoil's air layer and flattens mineral wool underneath it. Both lose a meaningful share of their insulating value the moment they're compressed, since thermal performance drops substantially once insulation is squeezed under a board with no support beneath it.
Other recurring errors: blocking eaves vents by pushing insulation or boarding right up against the soffit, burying downlights without fire-rated covers, and fixing boards straight through cables without checking their route first.
Statistic callout: Guidance from local building control teams puts it plainly, insulation "will compress" under boarding fitted without a gap, and where the structure's load-bearing capacity is in any doubt, qualified advice should be sought before proceeding.
Run through this before you load the loft with boxes:
- Insulation depth confirmed at or near 270mm, with no crushed patches under the new boards.
- Eaves vents and rafter trays clear and unobstructed.
- Loft hatch closes securely and insulates properly around its edges.
- Weight limits for your boarding checked and noted somewhere visible.
- All downlights and cables verified safe and clear of boarding fixings.
If you spot sagging joists, damp patches, or signs of a previous spray foam application while doing any of this, stop and call a professional rather than boarding over the problem.
When a professional survey beats a DIY attempt
Most straightforward lofts, standard joists, no previous insulation issues, clear access, are genuinely manageable as a DIY weekend. Where it gets murkier is previous spray foam installations, suspected structural weakness, or a sale and remortgage where the buyer's surveyor will ask hard questions about what's up there.
Technicians experienced in spray foam issues deal with exactly these grey areas, backed by a 10-year insurance-backed warranty and experience installing SuperFOIL systems alongside raised loft floors. A professional survey typically delivers drone photographs of the roof void, a written load assessment, and a report structured to satisfy building control or a mortgage surveyor, not just a verbal opinion on the day.
When you brief a professional, ask what the written report actually includes: photographs, load calculations, and a specification you can hand to a solicitor or surveyor tend to matter more at resale than the boarding job itself.
If you're getting quotes, ask what's covered in the report, how long turnaround takes, and whether the warranty covers the installation itself or just the materials.
What this guide gets right that most DIY advice misses
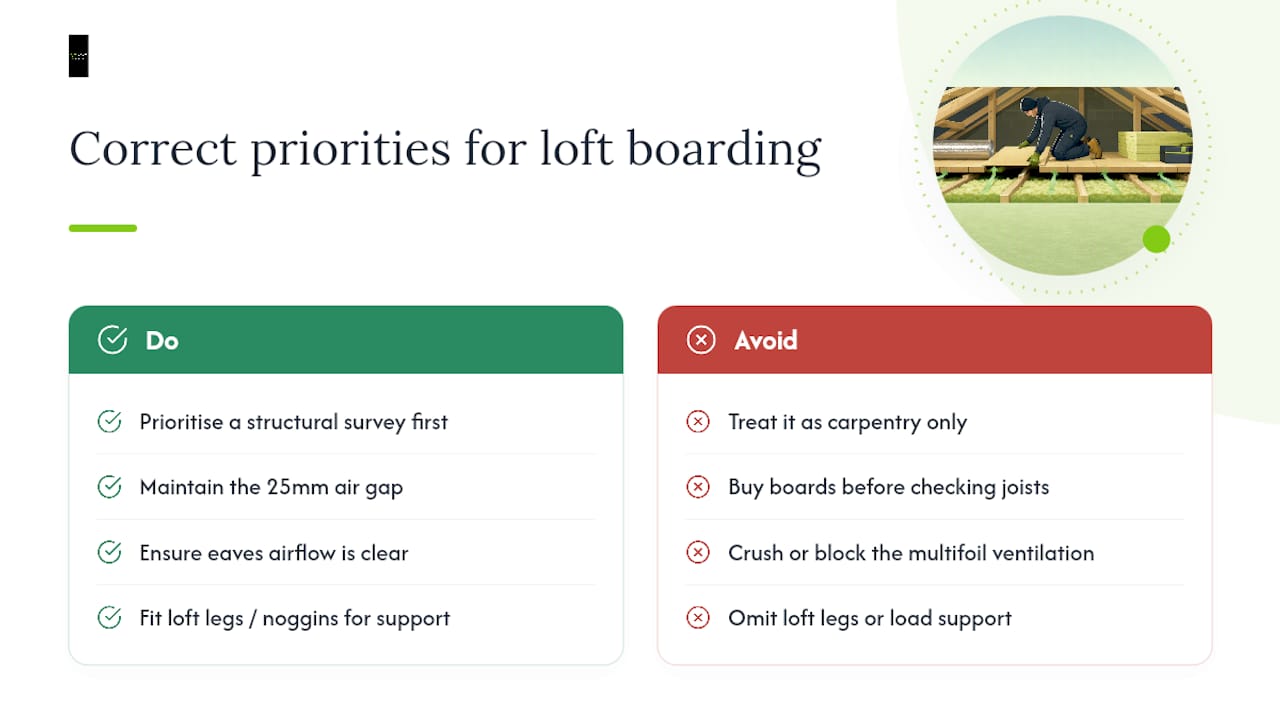
Most loft boarding advice online treats the job as carpentry: measure, cut, fix, done. That's how insulation gets crushed flat and condensation problems start eighteen months later, quietly, in a corner of the roof nobody checks until there's a damp patch on the bedroom ceiling.
The judgement this guide actually supports is that boarding is a ventilation and structural decision first, and a carpentry job second. Get the air gap and eaves airflow wrong, and no amount of careful board-laying rescues the thermal performance you paid for when the multifoil went in.
Where conventional advice falls short is in treating loft legs or noggins as optional extras rather than the actual point of the job. Homeowners regularly ask which board to buy before they've worked out whether their joists can even take the load, backwards priorities for a job that starts and ends with the structure beneath your feet.
If you take one thing from this, prioritise the survey over the shopping list. A joist that's borderline for load, or a multifoil layer that's already failed somewhere, changes everything downstream, and no board thickness fixes either problem after the fact.
— jessica*
Get a survey or installation booked with Revive Maintenance
A direct line is provided to the technicians actually doing the work, with no call centre or middlemen passing your job to subcontractors. For loft boarding jobs where you're unsure about joist load, previous spray foam, or whether your multifoil is still performing, that direct relationship matters, you're talking to the person assessing the loft, not a salesperson reading from a script.

The team handles the full range this article has covered: surveys from a Basic Visual Survey through to a Full Drone + Detailed Report, SuperFOIL installation, raised loft floor systems, and standard loft boarding itself. If your loft has previous spray foam insulation uncovered during inspection, that's covered too, with cost guidance available on the removal hub for closed and open cell removal.
Choosing professional survey services is advisable for lofts with uncertain joist capacity, signs of previous conversions, or situations where a surveyor's report must withstand scrutiny. Request a survey through the services page and you'll get a written report with photographs, a load assessment, and clear next steps before any boarding goes near your insulation.
Sources
- Is building regulations approval needed for a loft conversion? - Planning Portal
- Building Control Guidance Note 03B - Lancaster
- Best loft insulation materials compared — Renovation Notes
- Loft boarding UK: insulation, ventilation and common mistakes — Book A Builder UK
- Can you board over loft insulation? — Switchable
FAQ
What are the building regulations for boarding a loft in the UK?
Boarding for light storage, accessed by a removable ladder with no structural changes, generally falls outside building regulations. Fixed stairs, joist alterations, or converting the space into a habitable room all require building control approval.
Is multifoil better than PIR insulation?
Multifoil suits lofts with limited headroom but needs precise air gaps to perform, while PIR boards offer stronger conductive insulation but demand careful, exact cutting to fit. Independent comparisons find multifoil often underperforms deep mineral wool or PIR when air gaps aren't detailed correctly.
Can you board over loft insulation?
Yes, but only with a raised support system, loft legs, noggins, or a raised floor, that lifts the boarding clear of the insulation rather than pressing onto it. Boarding directly onto insulation compresses it and reduces its energy saving performance significantly.
Can you have too much insulation in a loft?
Piling insulation right up to the roofline without maintaining eaves ventilation creates condensation risk, even though the insulation depth itself, commonly 270mm, is a standard Part L target rather than excessive. The problem isn't the depth, it's blocking the airflow path that keeps the roof void dry.
Does Revive Maintenance install loft boarding over multifoil?
Yes, Revive Maintenance offers loft boarding alongside SuperFOIL installation and raised loft floor systems as part of its loft services. Current pricing and service details are available directly on the services page.